Since writing an introduction to the GIMP I’ve been asked to write some short tutorials for the GIMP, which I’d love to do. However, this article is more of a demonstration than a tutorial. Demonstrating the program layout and hopefully a taste of how powerful this software can be. Rather than following step-by-step, I hope you’ll be able to use the principles behind each tool to enhance your own photos.
The software
The GIMP can be used for simple tasks such as resizing and cropping, or for much more. Today, I’ll walk through editing a photo I took on New Year’s Eve.
All the screenshots show GIMP with the UbuntuStudio theme, the default theme is more like the Mac aqua themes (I just forgot to change it back before taking these shots!). You can see other screenshots here.
This is my original photo. I didn’t have much time to set up my tripod and settings, so the horizon isn’t level, the image is grainy and there’s some kind of cylindrical structure blocking my view. (I wish I’d read this guide to shooting fireworks first!)
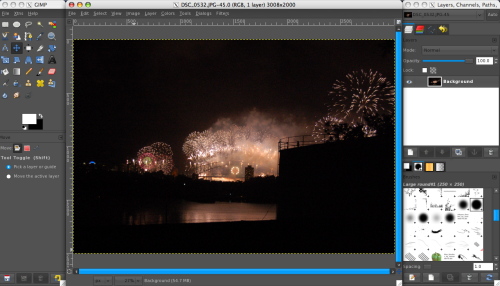
The tools dialogue is on the left, the image window in the middle, and on the right: layers, channels, paths, brushes, patterns and gradients. I wouldn’t mind having all these things in one window (dialogue windows are a bit passe!); there is a rumour of a single window option being in the works.
You can find a list of the tools in the GIMP documentation.
Straighten horizon
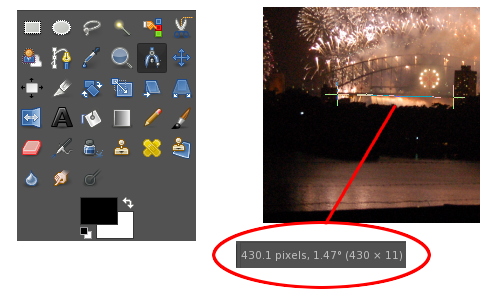
The first thing I wanted to do with this image was rotate it anti-clockwise so that the bottom of the bridge is horizontal. Rather than doing it by eye I like to quickly measure the angle to use in the rotate dialogue, which is done by clicking on one point and dragging to another.

Colours adjustment
Normally, my first port of call after rotating and cropping (sometimes before those things) is to adjust the levels (found under the Colors > Levels menu). This can help make colours more vibrant and bring a bit more contrast into the image.
However, when I was playing with these fireworks photographs I found that changing the levels increased the noise in the image. So I tried Colors > Curves instead. Curves had enough fine tuning to add more contrast to the image without increasing the noise. Have a look at LaurenMarie’s usage of these tools in photoshop.
It’s difficult to see in these tiny images, but the sky was quite grey-brown and grainy, after applying curve adjustment it was black and not as grainy.

Removing obstruction

The default memory usage for “undo” is 64MB. You can increase it, but naturally it will increase the amount of live memory that GIMP uses. So instead, when I’m going to make a really dramatic change (that I might not want later), I copy the layer I’ve been working with.
In the screenshot, ‘Fireworks’ is the original photo; ‘Fireworks copy’ has the rotation and curves adjustments, maybe slightly increased saturation (under Colors > Hue-Saturation); ‘Fireworks copy#1’ is for the next step.
Normally it’s better to try to frame your photo correctly in the first place, but sometimes you just can’t avoid eye-sores in your photos. Sometimes it’s just fun to flex these photo-manipulation muscles! So, I removed the obstructive concrete cylinder.
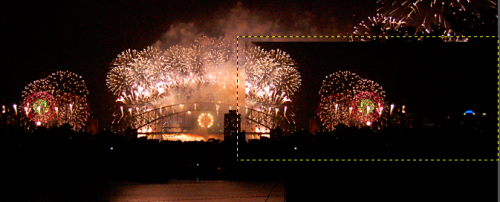
The cylinder was blocking the south pylon of the bridge, so I copied the north (left) section of the photograph, flipped it (Layer > Transform > Flip Horizontally) and merged it with the ‘Fireworks copy#1’ (right-click on the layer and ‘Merge Down’).
Now the edges need to be blended in and the smoke that was drifting south needs to be added back in. This is done using the clone and heal tools. 
To use either of these tools: select the corresponding button in the tool dialogue; ctrl+click on the part of the image you want to use as the source (the bit you want the bit you’re fixing to look like); use it like a paintbrush on the area you want to fix.
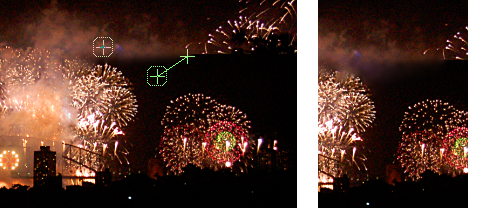
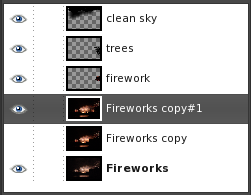
After filling in the smoke I added some final touches: filling in the bottom of the fireworks (by copying the top of the fireworks, flipping it and using the heal tool – as before); there was a tree over the fireworks before, so I tried to add that back in with a foliage brush to make it seem a bit more realistic; I smoothed out the sky a bit more with some simple black painting (with a fuzzy round brush).
Voila!

As with many of my productions I think there’s probably room for improvement. Looking at this all again I’m not quite convinced by the brushing of the tree that I did and it might have been nice to fill the reflection back into the water where the concrete block was. All the same, I’d say it was a definite improvement and I hope this was helpful in some way to demonstrate the GIMP.
Suggestions for improvement, comments and questions are welcome. I realise there’s a fair bit of jargon here, which will probably make sense to you if you’ve used other image editing programs. If there’s something you didn’t get… just ask. 🙂

It sounds like you can’t make an adjustment layer in GIMP. Is that right? In Photoshop there are two ways to adjust an image’s color: a permanent adjustment to the actual image layer and an adjustment layer, where you can go back later and adjust it a different way. No image data is actually changed with the adjustment layer. I always use an adj. layer because usually when I look at the image again, I’ll change my mind about the way I’ve altered the colors! I find this especially true if the image originally had a strong color cast… I’ll adjust it too much the other way and only realize it later.
You did a great job taking that cylinder thingy out! I like seeing the differences between GIMP and Photoshop. Now if we can just get someone here that uses Macromedia Fireworks (ha, originally that’s what I thought this was about!)
Hey LaurenMarie!
That’s correct. GIMP doesn’t have adjustment layers 🙁
That’s one difference I’ve learnt that I’m keen to try out. There’s gotta be some reasons that people pay that much for PS!
Thanks for the compliment.
Oh, heh – I haven’t really heard much about Fireworks at all. 😛
i don’t know how to use gimp 😥 😥 😥 😥 😥 😥 🙁 :worried:
maria, GIMP, like most potentially powerful software, has a learning curve. However, I don’t think it’s incredibly difficult to learn.
I wrote a post linking to GIMP tutorial sites, where you might be able to find some starter tutorials. I’m always happy to answer questions too.